
अगर आप अपनी website या blog को Google Search में grow करना चाहते हैं, तो Google Search Console एक ऐसा free tool है जिसे आपको जरूर समझना चाहिए। इसकी मदद से आप देख सकते हैं कि आपकी website Google Search में कैसी perform कर रही है, किन search queries से लोग आपकी site तक पहुंच रहे हैं, कौन से pages Google को मिल रहे हैं और किन technical या indexing issues पर ध्यान देने की जरूरत हो सकती है।
अगर आपने अभी website शुरू की है और आपको समझ नहीं आ रहा कि Google Search Console setup कैसे करें या Google Search Console में website कैसे add करें, तो यह guide आपके लिए है।
अगर आप website को digital presence के रूप में क्यों और कैसे मजबूत करना चाहते हैं, तो हमारी आपके बिजनेस के लिए Website क्यों जरूरी है guide भी पढ़ सकते हैं।
इस article में हम बिल्कुल beginner-friendly तरीके से समझेंगे:
- Google Search Console क्या है?
- यह क्यों जरूरी है?
- Google Search Console में website कैसे add करें?
- Domain Property और URL-prefix Property में क्या अंतर है?
- Website ownership verify कैसे करें?
- Sitemap कैसे submit करें?
- URL Inspection Tool का इस्तेमाल कैसे करें?
- Performance Report में clicks, impressions, CTR और position क्या हैं?
- Indexing issues कैसे समझें?
- Beginners की common mistakes क्या हैं?
- SEO के लिए Search Console का practical इस्तेमाल कैसे करें?
Google Search Console क्या है?
Google Search Console Google का एक tool है जिसकी मदद से website owners, bloggers, SEO professionals और developers अपनी website की Google Search performance को monitor और troubleshoot कर सकते हैं।
सरल भाषा में कहें तो:
Google Search Console आपको यह समझने में मदद करता है कि Google आपकी website को Search में कैसे देख रहा है और आपकी website Google Search में कैसी performance दे रही है।
इससे आप कई महत्वपूर्ण चीजों को monitor कर सकते हैं, जैसे:
- Google Search से आने वाले clicks
- Search impressions
- Search queries
- Average position
- Click-through rate यानी CTR
- Indexing से जुड़े issues
- Sitemap processing
- URL inspection
- कुछ technical और page-related reports
- Search performance में बदलाव
Google के अनुसार Performance report में आप यह देख सकते हैं कि आपकी site किन queries पर दिखाई दे रही है और कौन से pages बेहतर या कमजोर click-through rate दे रहे हैं।
अगर आप SEO की basic understanding पहले मजबूत करना चाहते हैं, तो हमारी SEO क्या है और इसका क्या महत्व है guide भी उपयोगी रहेगी।
Google Search Console क्यों जरूरी है?
सिर्फ website बना लेना पर्याप्त नहीं है। Website publish करने के बाद आपको यह भी समझना होता है कि Google उसे discover, crawl और index कर रहा है या नहीं और Search में users तक आपका content किस तरह पहुंच रहा है।
Google Search Console इस process में useful data और reports देता है।
1. आप अपनी Search performance देख सकते हैं
Performance report से आपको पता चल सकता है कि आपकी website को Google Search से कितने clicks और impressions मिल रहे हैं।
उदाहरण के लिए मान लीजिए आपने article लिखा:
“Digital Marketing क्या है?”
कुछ समय बाद Search Console में आपको पता चल सकता है कि users आपकी website को किन queries के लिए देख रहे हैं।
यह information आपको future content और SEO improvements के लिए useful insights दे सकती है।
2. Search queries समझ सकते हैं
Search Console में queries देखकर आप समझ सकते हैं कि users किन terms के साथ आपकी website तक पहुंच रहे हैं।
यह keyword research का replacement नहीं है, लेकिन existing content को बेहतर समझने के लिए काफी useful source हो सकता है।
3. Indexing problems identify कर सकते हैं
अगर कोई important page Google Search में दिखाई नहीं दे रहा है, तो Search Console के indexing-related reports और URL Inspection Tool से आप उसकी स्थिति को investigate कर सकते हैं।
ध्यान रखें:
Indexing और ranking एक ही चीज नहीं हैं।
किसी page का indexed होना यह guarantee नहीं करता कि वह किसी particular keyword पर अच्छी ranking हासिल करेगा।
4. Sitemap monitor कर सकते हैं
Search Console में Sitemap report की मदद से submitted sitemap की processing और उससे संबंधित errors को monitor किया जा सकता है।
5. SEO decisions data के आधार पर ले सकते हैं
Guesswork करने के बजाय आप Search Console data देखकर यह identify कर सकते हैं कि:
- कौन से pages अच्छा perform कर रहे हैं
- किन queries से impressions आ रहे हैं
- किन pages को बेहतर title या content की जरूरत हो सकती है
- Search performance समय के साथ कैसे बदल रही है
Google Search Console में Website कैसे Add करें?
अब practical part शुरू करते हैं।
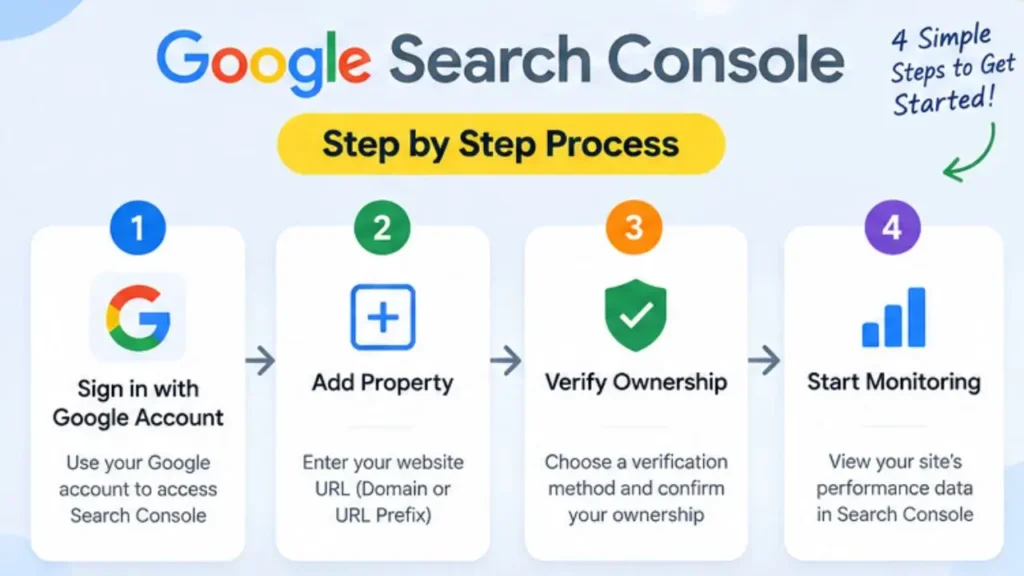
Google Search Console में website कैसे add करें, इसे समझने के लिए सबसे पहले Search Console में अपने Google account से sign in करें।
इसके बाद property selector से Add property option चुनें।
Google Search Console में website property के लिए मुख्य रूप से दो options मिलते हैं:
- Domain property
- URL-prefix property
Domain Property क्या है?
Domain property पूरे domain को broadly cover करने के लिए इस्तेमाल की जाती है।
उदाहरण:
example.com
Domain property में अलग-अलग protocols और subdomains को एक साथ cover किया जा सकता है।
Google के अनुसार Domain property में verification के लिए DNS verification की आवश्यकता होती है।
अगर आपके पास DNS records manage करने की access है और आप पूरे domain का consolidated Search Console data चाहते हैं, तो Domain property एक practical option हो सकती है।
URL-prefix Property क्या है?
URL-prefix property किसी specific URL prefix को track करती है।
उदाहरण:
यह property protocol और specified URL prefix पर निर्भर करती है।
इसलिए अगर आप URL-prefix property बनाते हैं, तो URL को सही format में enter करना जरूरी है।
उदाहरण के लिए:
और
http://example.com/
एक जैसे नहीं माने जाते।
इसी तरह www और non-www versions भी अलग हो सकते हैं, जबकि Domain property broader coverage दे सकती है।
Google Search Console Setup: Step-by-Step Process
अब पूरा Google Search Console setup आसान steps में समझते हैं।
Step 1: Google Search Console खोलें
अपने Google account से Search Console में sign in करें।
अगर आप पहली बार इसका इस्तेमाल कर रहे हैं, तो आपको property add करने का option मिलेगा।
Step 2: Add Property पर जाएं
Property selector खोलें और Add property चुनें।
इसके बाद आपको website property का type चुनना होगा।
Step 3: Domain या URL-prefix चुनें
अब decide करें कि आपको:
- पूरा domain track करना है, या
- specific URL prefix track करना है।
Beginner के लिए क्या चुनें?
अगर आप DNS verification कर सकते हैं और पूरे domain का data एक property में manage करना चाहते हैं, तो Domain property practical choice हो सकती है।
अगर आप किसी specific URL prefix के लिए property बनाना चाहते हैं या available verification method के अनुसार setup करना चाहते हैं, तो URL-prefix property उपयोगी हो सकती है।
यह decision आपकी website configuration और access पर depend करता है।
अगर आपकी website WordPress/hosting पर है और hosting की basic understanding चाहिए, तो हमारी Hostinger क्या है और इसका क्या काम है guide भी उपयोगी हो सकती है।
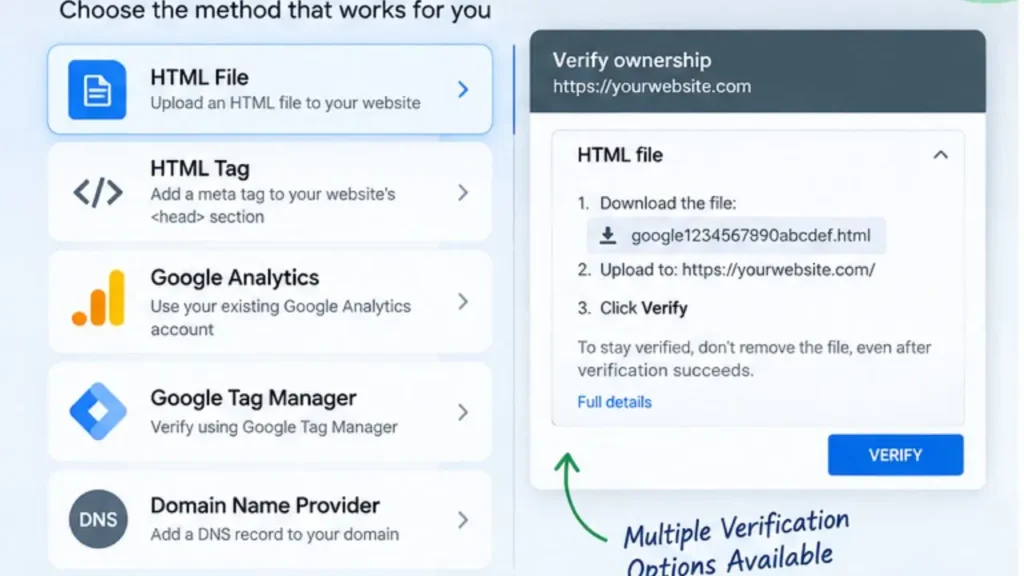
Step 4: Website Ownership Verify करें
Property add करने के बाद Google को यह confirm करना होता है कि आप उस website को manage करने के अधिकार रखते हैं।
Verification method property type के अनुसार बदल सकता है।
Domain Property
Domain property के लिए DNS record verification इस्तेमाल किया जाता है।
इसमें आपको अपने domain की DNS settings में Google द्वारा दिया गया record add करना पड़ सकता है।
URL-prefix Property
URL-prefix property के लिए कई verification methods उपलब्ध हो सकते हैं।
आपके setup के अनुसार Google अलग-अलग verification options दिखा सकता है।
इसलिए पुराने tutorials में दिखाई देने वाले exact verification screens पर blindly depend करने के बजाय Search Console में उस समय दिए गए instructions follow करें।
Google Search Console Verification के बाद क्या करें?
Verification successful होने के बाद आपका basic setup पूरा हो जाता है।
लेकिन यहीं रुकना नहीं चाहिए।
अब आपको website की important SEO information को व्यवस्थित रूप से monitor करना शुरू करना चाहिए।
सबसे पहले इन areas पर ध्यान दें:
- Performance
- URL Inspection
- Sitemaps
- Page indexing
- Core Web Vitals और अन्य उपलब्ध reports
- Settings और permissions
Search Console में Sitemap कैसे Submit करें?
Sitemap एक file होती है जिसमें website के important URLs के बारे में information होती है।
यह Google को website के pages discovery में मदद कर सकती है।
Search Console के Sitemaps report में आप sitemap URL submit और monitor कर सकते हैं।
आमतौर पर WordPress websites में sitemap SEO plugin या WordPress setup के माध्यम से automatically generate हो सकता है।
लेकिन sitemap का exact URL आपके website configuration पर depend करता है।
इसलिए बिना verify किए कोई assumed sitemap URL submit न करें।
Sitemap submit करने का basic process
- Search Console में अपनी property select करें।
- Sitemaps report खोलें।
- Sitemap URL enter करें।
- Submit करें।
- बाद में status check करें।
- अगर processing error दिखे तो details investigate करें।
महत्वपूर्ण बात:
Sitemap submit करने का अर्थ यह नहीं है कि Google आपकी हर URL को automatically index करेगा।
Sitemap Google को URLs के बारे में जानकारी देने का एक तरीका है; indexing और ranking अलग processes हैं।
URL Inspection Tool क्या है?
URL Inspection Tool Search Console का बहुत useful feature है।
इसकी मदद से आप किसी specific URL की Google Search visibility और indexing-related status को investigate कर सकते हैं।
मान लीजिए आपने Digital Gyan Hub पर एक नया article publish किया है।
आप उसका URL Search Console के URL Inspection Tool में डालकर देख सकते हैं कि Google उस URL के बारे में क्या information दिखा रहा है।
यह खास तौर पर तब useful होता है जब:
- नया article publish किया हो
- existing article update किया हो
- indexing status check करना हो
- किसी URL की Google accessibility investigate करनी हो
अगर Google उस page को access नहीं कर पा रहा है, तो URL Inspection आपको समस्या investigate करने में मदद कर सकता है।
New Blog Publish करने के बाद Search Console का इस्तेमाल कैसे करें?
मान लीजिए आपने आज एक नया blog article publish किया।
आपका practical workflow कुछ इस तरह हो सकता है:
Step 1: Article publish करें
सबसे पहले article को properly publish करें।
Check करें:
- URL सही है
- Page accessible है
- Internal links relevant हैं
- Content useful है
- Page accidentally noindex नहीं है
Step 2: URL Inspection करें
Search Console में article URL inspect करें।
अगर appropriate हो, तो indexing request का option उपलब्ध हो सकता है।
लेकिन हर article को repeatedly request indexing करना SEO strategy नहीं है।
Step 3: Sitemap check करें
यह confirm करें कि आपका sitemap properly available और processed है।
Step 4: कुछ समय बाद Performance देखें
Search Console को तुरंत traffic-reporting tool की तरह judge न करें।
नए content को Search में discover और process होने में समय लग सकता है।
इसके बाद Performance report में relevant data दिखाई देने पर queries, clicks और impressions analyze करें।
Google Search Console Performance Report कैसे समझें?
Beginners के लिए Performance report थोड़ा confusing हो सकता है।
इसके चार important metrics समझना जरूरी है:
| Metric | आसान मतलब |
| Clicks | Search results से आपकी website पर कितने clicks आए |
| Impressions | आपकी website Search results में कितनी बार दिखाई गई |
| CTR | Impressions के मुकाबले clicks का percentage |
| Average Position | Search results में आपकी property/page की reported average position |
इन metrics को context के साथ समझना चाहिए।
Clicks क्या हैं?
जब कोई user Google Search result से आपकी website पर click करता है, तो Search Console में उस interaction को click data में reflect किया जा सकता है।
उदाहरण:
अगर किसी article को 100 search clicks मिले, तो उस article से Google Search से 100 clicks आए।
Impressions क्या हैं?
Impression का मतलब broadly यह है कि आपका result Google Search results में user को दिखाई दिया।
उदाहरण:
अगर आपका page किसी query के लिए कई बार Search results में दिखता है, तो impressions accumulate हो सकते हैं।
लेकिन impression को traffic के बराबर नहीं समझना चाहिए।
CTR क्या है?
CTR यानी Click-Through Rate यह बताता है कि Search impressions में से कितने percentage interactions clicks में बदल रहे हैं।
Simple formula:
CTR = Clicks ÷ Impressions × 100
उदाहरण:
अगर:
- Impressions = 1,000
- Clicks = 50
तो CTR:
50 ÷ 1,000 × 100 = 5%
CTR को अकेले देखकर page की quality का final judgment नहीं करना चाहिए। Query, position, search feature और user intent जैसे factors भी महत्वपूर्ण हैं।
Average Position क्या होती है?
Search Console में average position एक aggregated metric है।
यह जरूरी नहीं कि इसका मतलब हो कि आपका page हर search में exactly उसी position पर दिखाई देता है।
कई queries और results को aggregate करके position report की जाती है।
इसलिए केवल average position देखकर यह conclusion निकालना सही नहीं होगा कि:
“मेरा article हमेशा Google पर इसी position पर है।”
इसके बजाय query और page-level data को context के साथ analyze करें।
Search Console से Keyword Ideas कैसे निकालें?
Search Console existing website data के आधार पर useful keyword insights दे सकता है।
मान लीजिए आपके article का primary topic है:
Digital Marketing
लेकिन Performance report में आपको related queries भी दिखाई देती हैं।
उदाहरण के तौर पर users अलग-अलग variations से आपका content discover कर सकते हैं।
आप इन queries को देखकर identify कर सकते हैं:
- कौन से topics users को attract कर रहे हैं
- कौन से queries के impressions ज्यादा हैं
- किन queries पर clicks कम हैं
- कौन से pages multiple related searches के लिए दिखाई दे रहे हैं
इसके आधार पर आप existing article को improve कर सकते हैं या genuinely useful नया content plan कर सकते हैं।
लेकिन केवल Search Console में कोई query दिखने से उस query को अलग article बनाने की जरूरत नहीं होती।
पहले search intent और existing content coverage check करें।
Low CTR वाले Pages को कैसे Analyze करें?
मान लीजिए किसी page को काफी impressions मिल रहे हैं लेकिन clicks comparatively कम हैं।
यह एक signal हो सकता है कि आपको उस search result की presentation और intent alignment को investigate करना चाहिए।
आप review कर सकते हैं:
- SEO title
- Meta description
- Search intent alignment
- Content quality
- Page relevance
- Search result context
लेकिन तुरंत title बदल देना हमेशा सही solution नहीं है।
पहले यह समझें कि users किस query पर page देख रहे हैं और Search results में उनका actual intent क्या है।
Search Console में Indexing Issues कैसे समझें?
अगर आपका कोई important page Google Search में नहीं दिख रहा है, तो panic करने के बजाय systematic investigation करें।
Possible reasons अलग-अलग हो सकते हैं।
उदाहरण:
- Google ने अभी page discover नहीं किया
- Page crawl नहीं हुआ
- Page indexing के लिए eligible नहीं है
- Technical issue है
- Page duplicate या canonicalization-related situation में है
- Website access में problem है
- Page पर intentional noindex configuration है
Search Console के Page Indexing और URL Inspection reports investigation में useful हो सकते हैं।
क्या हर URL को Manually Index करवाना जरूरी है?
नहीं।
यह एक common beginner misconception है।
Search Console में URL Inspection के माध्यम से indexing request उपलब्ध हो सकती है, लेकिन इसका मतलब यह नहीं है कि हर page को बार-बार manually submit करना चाहिए।
Google crawling और discovery के लिए कई signals का इस्तेमाल करता है।
एक healthy website के लिए बेहतर approach है:
- Clear site structure
- Useful content
- Internal links
- Accessible pages
- Appropriate sitemap
- Correct technical configuration
और जरूरत पड़ने पर URL Inspection का उपयोग करना।
Google Search Console की Common Beginner Mistakes
1. केवल ranking देखने के लिए Search Console खोलना
Search Console सिर्फ ranking देखने का tool नहीं है।
इसमें performance, queries, indexing, sitemap और technical signals से जुड़ी useful information भी मिल सकती है।
2. हर दिन data check करना
SEO में daily fluctuations normal हो सकते हैं।
हर छोटे बदलाव पर strategy बदलना सही नहीं है।
इसके बजाय meaningful date ranges और trends को देखें।
3. Impressions को traffic समझ लेना
Impressions का मतलब clicks नहीं है।
आपकी website हजारों impressions पा सकती है लेकिन clicks कम हो सकते हैं।
इसलिए impressions, CTR और clicks को साथ में समझें।
4. Average position को exact ranking समझना
Average position aggregated data है।
यह जरूरी नहीं कि हर user और हर query में आपका page उसी position पर दिखे।
5. Sitemap submit करने के बाद तुरंत ranking expect करना
Sitemap submission discovery और crawling में मदद कर सकता है, लेकिन यह ranking guarantee नहीं है।
Ranking कई factors पर depend करती है।
6. Indexing और ranking को एक समझना
एक page indexed हो सकता है लेकिन जरूरी नहीं कि वह target keyword पर top results में rank करे।
इसलिए:
Indexing ≠ Ranking
7. हर छोटी technical warning से घबरा जाना
Search Console reports में दिखने वाली हर issue समान priority की नहीं होती।
पहले देखें:
- Issue किस URL को affect कर रहा है?
- क्या वह important URL है?
- क्या Google Search performance पर वास्तविक impact है?
- क्या कोई clear technical problem मौजूद है?
फिर action लें।
Beginners के लिए Google Search Console का Simple Weekly Workflow
अगर आप अभी शुरुआत कर रहे हैं, तो बहुत complicated process की जरूरत नहीं है।
एक simple weekly workflow अपनाया जा सकता है।
Step 1: Performance देखें
पिछले कुछ समय के clicks, impressions, CTR और queries देखें।
Step 2: Top pages identify करें
देखें कौन से pages सबसे ज्यादा Search traffic ला रहे हैं।
Step 3: Search queries analyze करें
देखें users किन terms से आपके content तक पहुंच रहे हैं।
Step 4: Important indexing issues देखें
अगर कोई important page या group of pages indexing problem दिखा रहा है, तो investigate करें।
Step 5: Sitemap status check करें
अगर आपने sitemap submit किया है, तो processing status और errors पर नजर रखें।
Step 6: Content improvement opportunities निकालें
Search Console data को अपने content strategy के साथ combine करें।
उदाहरण:
अगर किसी article को relevant queries पर impressions मिल रहे हैं लेकिन content उन queries को पर्याप्त depth से cover नहीं करता, तो article update करने का opportunity हो सकता है।
Google Search Console और SEO में इसका सही इस्तेमाल
Search Console को अकेले SEO strategy न मानें।
एक complete SEO workflow में आपको कई areas पर काम करना पड़ सकता है:
- Keyword Research
- Search Intent
- Helpful Content
- On-Page SEO
- Internal Linking
- Technical SEO
- Website Performance
- Content Updates
- Search Console Analysis
उदाहरण के लिए, Search Console आपको यह बता सकता है कि users किस query के लिए आपके page को देख रहे हैं।
लेकिन यह आपकी पूरी content strategy अपने आप नहीं बना देगा।
आपको data की interpretation करनी होगी।
अगर आप SEO और digital marketing को systematically सीखना चाहते हैं, तो Digital Gyan Hub की Digital Marketing सीखने की Step-by-Step Guide भी देख सकते हैं।
इसके अलावा, SEO और website optimization से जुड़े practical resources के लिए आप Digital Gyan Hub के SEO Tools section को भी explore कर सकते हैं।
Google Search Console से क्या-क्या पता नहीं चलता?
Search Console useful है, लेकिन यह हर SEO question का answer नहीं देता।
उदाहरण:
- यह आपकी complete competitor strategy नहीं बताता।
- यह किसी keyword की guaranteed future ranking नहीं बताता।
- यह यह guarantee नहीं करता कि कोई page rank करेगा।
- हर possible search query का complete data उपलब्ध होना जरूरी नहीं है।
- Reported data और actual user behavior को context के साथ समझना जरूरी है।
इसलिए Search Console को broader SEO workflow का हिस्सा समझें।
Google Search Console और Google Analytics में अंतर
Beginners अक्सर दोनों tools को एक ही समझ लेते हैं।
लेकिन दोनों का focus अलग है।
| Google Search Console | Google Analytics |
| Google Search performance पर focus | Website/app user behavior पर broader focus |
| Search queries | User activity |
| Search clicks | On-site engagement |
| Impressions | Website traffic analysis |
| Search position data | Audience/behavior analysis |
| Indexing-related reports | Website/app analytics |
सरल भाषा में:
Search Console = Google Search में आपकी visibility और performance
Analytics = आपकी website/app पर users के behavior को समझने का broader analytics environment
दोनों tools को सही context में इस्तेमाल करने पर SEO analysis ज्यादा useful हो सकता है।
Digital Gyan Hub के लिए Search Console का Practical Use
Digital Gyan Hub जैसी educational website के लिए Search Console खास तौर पर useful हो सकता है।
मान लीजिए website पर अलग-अलग clusters हैं:
- SEO
- Digital Marketing
- YouTube
- AI
- Canva
- Freelancing
- Online Earning
Performance data से आप identify कर सकते हैं कि कौन से content areas Search में traction प्राप्त कर रहे हैं।
इसके बाद content team:
- Existing articles को update कर सकती है।
- Related topics identify कर सकती है।
- Internal linking improve कर सकती है।
- Content gaps खोज सकती है।
- Underperforming pages को analyze कर सकती है।
इस तरह Search Console सिर्फ reporting tool नहीं, बल्कि content decision-making resource भी बन सकता है।
Digital Gyan Hub के बारे में
Digital Gyan Hub का focus digital marketing और digital skills को simple, practical और beginner-friendly तरीके से समझाने पर है।
अगर आप जानना चाहते हैं कि Digital Gyan Hub क्या है और यहां किस तरह के digital learning resources मिल सकते हैं, तो हमारा About page जरूर देखें।
Google Search Console इस्तेमाल करने के लिए Beginners Checklist
अपनी website के लिए यह checklist save कर सकते हैं:
- Search Console property add की
- Ownership verify की
- सही property/version चुना
- Sitemap available है
- Sitemap status check किया
- Important URLs inspect किए
- Performance report समझी
- Search queries देखीं
- Top pages identify किए
- Indexing issues review किए
- Important content updates के बाद performance monitor की

Conclusion: Google Search Console को SEO Workflow का हिस्सा बनाएं
Google Search Console beginners के लिए initially थोड़ा technical लग सकता है, लेकिन इसकी basic functionality समझने के बाद यह website management और SEO analysis का काफी useful हिस्सा बन सकता है।
अगर आपने अभी website शुरू की है, तो सबसे पहले:
- Search Console property add करें।
- Ownership verify करें।
- Sitemap setup और status check करें।
- Important URLs को inspect करें।
- Performance report समझें।
- Queries, clicks, impressions और CTR को context के साथ analyze करें।
- Indexing issues को investigate करें।
- Data के आधार पर content और SEO improvements करें।
सबसे महत्वपूर्ण बात यह है कि Search Console को “Google में जल्दी rank करने का button” न समझें।
इसे एक data और diagnostic tool की तरह इस्तेमाल करें। जब आप Search Console data को helpful content, search intent, technical SEO और internal linking के साथ combine करते हैं, तब इससे ज्यादा meaningful insights मिल सकते हैं।
अगर आप Digital Marketing और SEO को beginner-friendly तरीके से step-by-step सीखना चाहते हैं, तो Digital Gyan Hub की Digital Marketing सीखने की Step-by-Step Guide से अपनी learning journey आगे बढ़ा सकते हैं।
अगर आपको Digital Gyan Hub के content, guides या resources से जुड़ा कोई सवाल, feedback या suggestion है, तो आप Digital Gyan Hub के Contact page के माध्यम से हमसे संपर्क कर सकते हैं।
Practical Next Step: आज ही अपनी website को Google Search Console में add करें, ownership verify करें और Performance तथा Sitemaps reports को explore करना शुरू करें। शुरुआत में हर metric को समझने की कोशिश करने के बजाय पहले clicks, impressions, queries और indexing status पर focus करें।
Digital Gyan Hub पर हमारा उद्देश्य digital skills को simple और practical तरीके से समझाना है—इसलिए सीखते रहें, data को समझें और अपनी website पर धीरे-धीरे improvements लागू करें।
FAQs
Q1: Google Search Console क्या है?
Ans: Google Search Console Google का website-management और Search-performance monitoring tool है। इससे website owners Search performance, queries, indexing और sitemap-related information monitor कर सकते हैं।
Q2: Google Search Console में website कैसे add करें?
Ans: Search Console में sign in करके property selector से Add property चुनें। इसके बाद Domain या URL-prefix property select करें और Google द्वारा दिए गए ownership verification steps follow करें।
Q3: Google Search Console setup के लिए क्या चाहिए?
Ans: आपको website property manage करने की access और selected property type के अनुसार ownership verification करने की क्षमता चाहिए। Domain property के लिए DNS verification आवश्यक होती है।
Q4: क्या Google Search Console free है?
Ans: Google Search Console Google द्वारा उपलब्ध कराया गया tool है और website owners इसका उपयोग Search performance तथा related reports monitor करने के लिए कर सकते हैं।
Q5: Search Console में website verify क्यों करनी पड़ती है?
Ans: Verification का उद्देश्य यह confirm करना है कि आपके पास उस website या property को manage करने का अधिकार है।